Your Child’s Room Feels Incomplete, and You Can See It. Fill those empty walls in minutes with our removable decals, instant colour, joy, and magic, no paint required.
Our decals are designed for easy application and clean removal on most walls. To ensure the best, longest-lasting results and avoid any surprises, please follow these tips carefully.
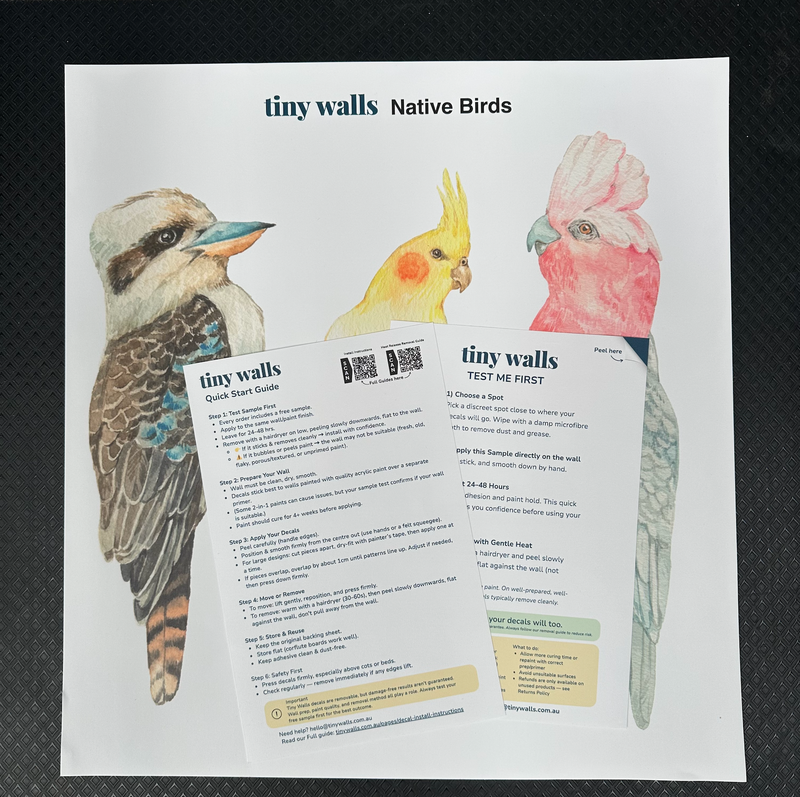
1. Test First — Your Free Sample
Every order includes a wall test sample. Apply it to the same wall and paint finish where your decals will go, leave it for 24–48 hours, then remove using gentle heat and a slow downward peel (flat against the wall, not outwards).
- If it applies and removes cleanly, you can install with confidence.
- If you notice bubbling or paint peeling, your wall may not be suitable — this can happen with fresh paint, old or flaky paint, porous or textured surfaces, or if a separate primer wasn’t used.
- Refunds are only available on unused products. Please see our Returns Policy for full details.
2. Wall Preparation
- For smooth application and best adhesion, your wall should be:
- Clean, dry, and smooth
- Painted with two coats of good-quality acrylic paint over a separate primer (avoid 2-in-1 paint + primer products)
- Fully cured for at least four weeks (paint may feel dry but still needs time to harden) and outgas, if this is ont followed decals can fall down as they cannot adhere properly
- Newly painted or poorly prepared walls can lead to bubbling or peeling when decals are repositioned or removed.
3. Paint Type Matters
Even professionally painted walls can cause issues if:
- A separate primer wasn’t used
- The paint is stain-resistant, washable, or Teflon-based (these resist adhesion if not primed correctly)
- The wall wasn’t sealed, or old flaky paint wasn’t removed before repainting
- The surface wasn’t sanded before repainting, so new paint couldn’t bond properly
- The paint is very old, brittle, or weakly bonded, which may cause lifting during removal
4. Prep Checklist
- Wash your hands
- Wipe the wall gently with a damp microfibre cloth
- Allow the surface to dry completely
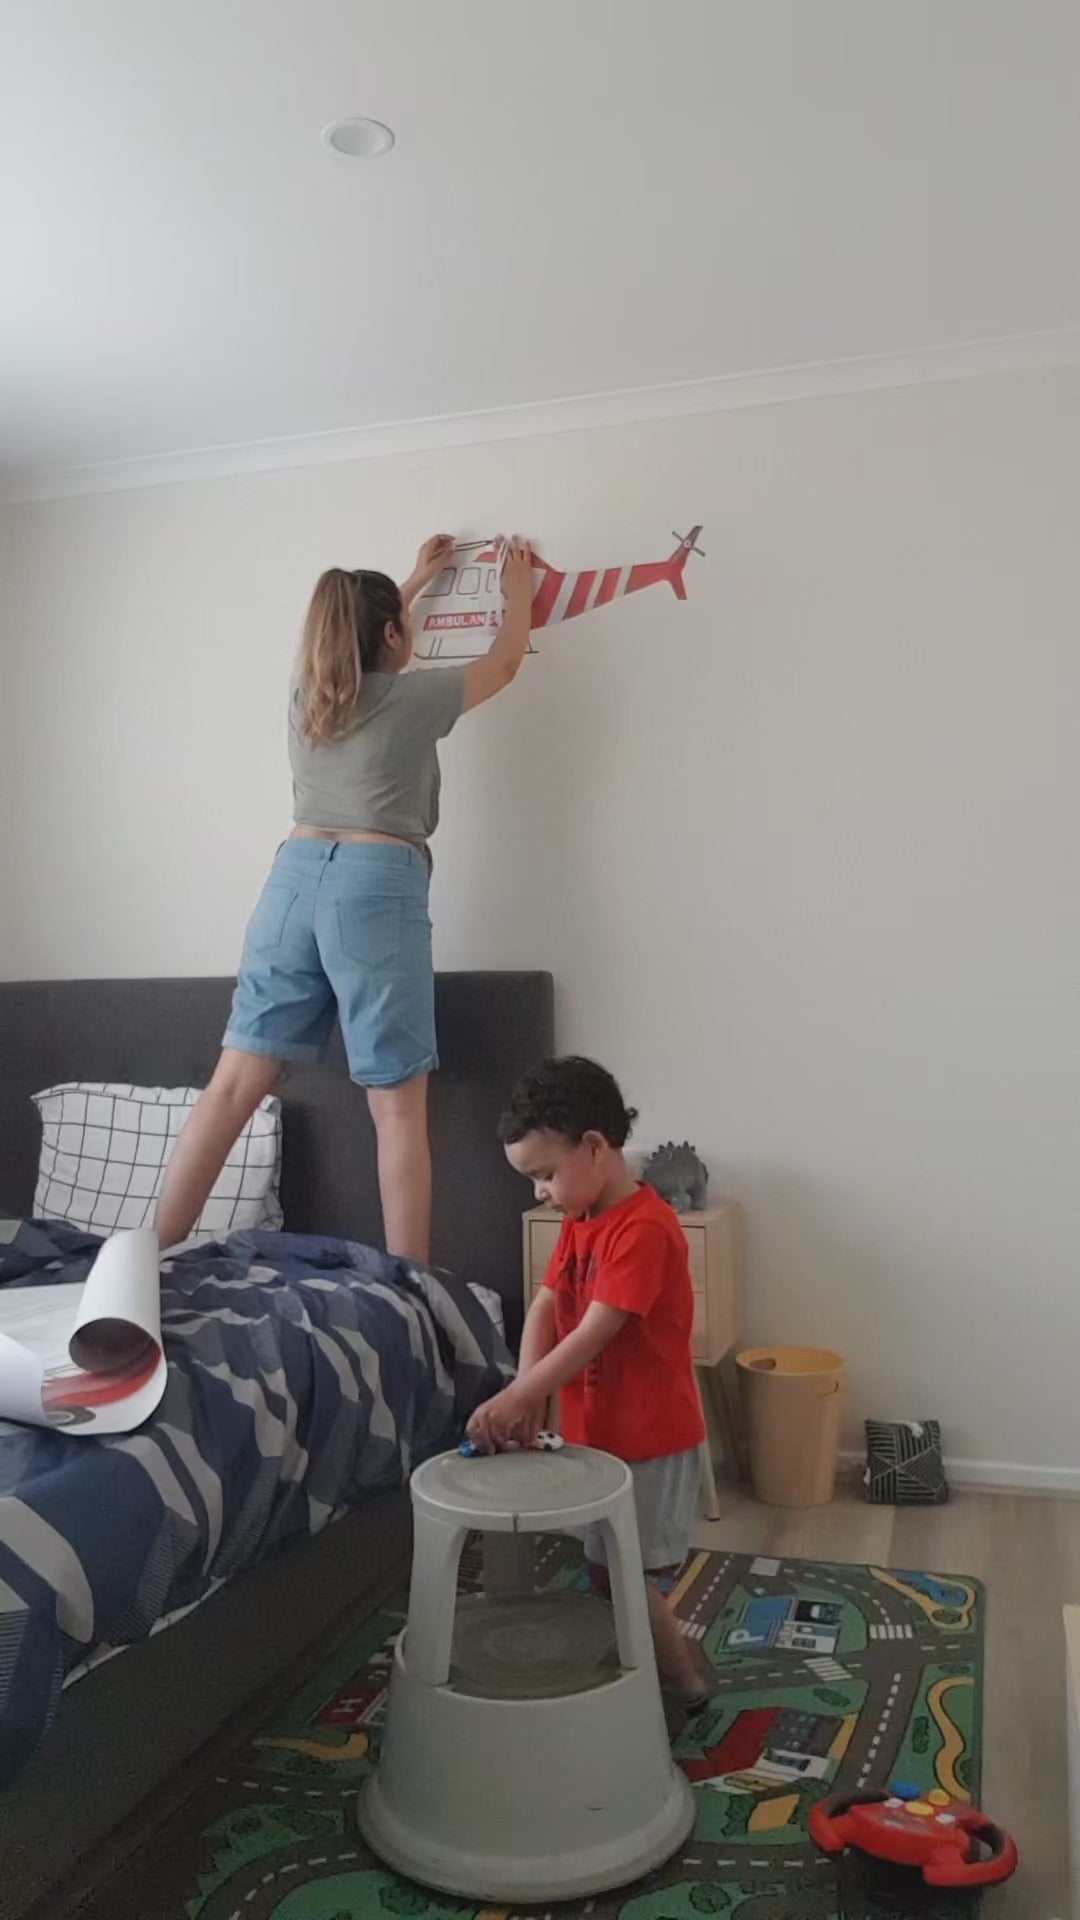
5. Applying Your Decals
-
Peel carefully from the backing sheet, handling the edges and avoiding touching the adhesive.
-
Position on the wall and smooth firmly with your hands or a felt squeegee, working from the centre outward—pressure helps the adhesive bond. Be careful not to scratch the decal surface.
-
For larger decals supplied in separate pieces: lay out the full design first, cut pieces apart (trim excess backing for easier handling), use painter’s tape to dry-fit/position, then apply one piece at a time, smoothing firmly as you go.
-
If pieces overlap: align the patterns carefully. If the design looks slightly off, rotate the piece a little left or right until the overlap sits naturally, then smooth and press firmly to finish.
6. Repositioning
- Keep hands and wall clean
- Press firmly after repositioning
- Avoid shifting large sections at once, especially on delicate paint
7. Removing Your Decals
- Warm the decal with a hairdryer on low for 30–60 seconds
- Peel slowly from one corner, keeping the decal flat against the wall
- Use more heat if needed
- Gentle heat and a slow, downward peel are safest for delicate paint. On well-prepared, well-bonded paint, decals typically remove cleanly
8. Storage Tip
- Keep the original backing paper if you plan to move or store decals
- Corflute sheets (available at Bunnings or hardware stores) also work well
- Keep adhesive clean and free of dust to maintain reusability
9. Safety Reminder
- Press decals firmly, especially above cots or beds
- Check regularly and remove immediately if any edges start to lift
Important
Tiny Walls decals are designed to be removable, but damage-free results cannot be guaranteed in every case. Wall preparation, paint quality, and removal method all play a role. Testing with your sample first and following this guide will give you the best possible outcome.


Product Description + Sizing Info
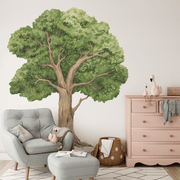
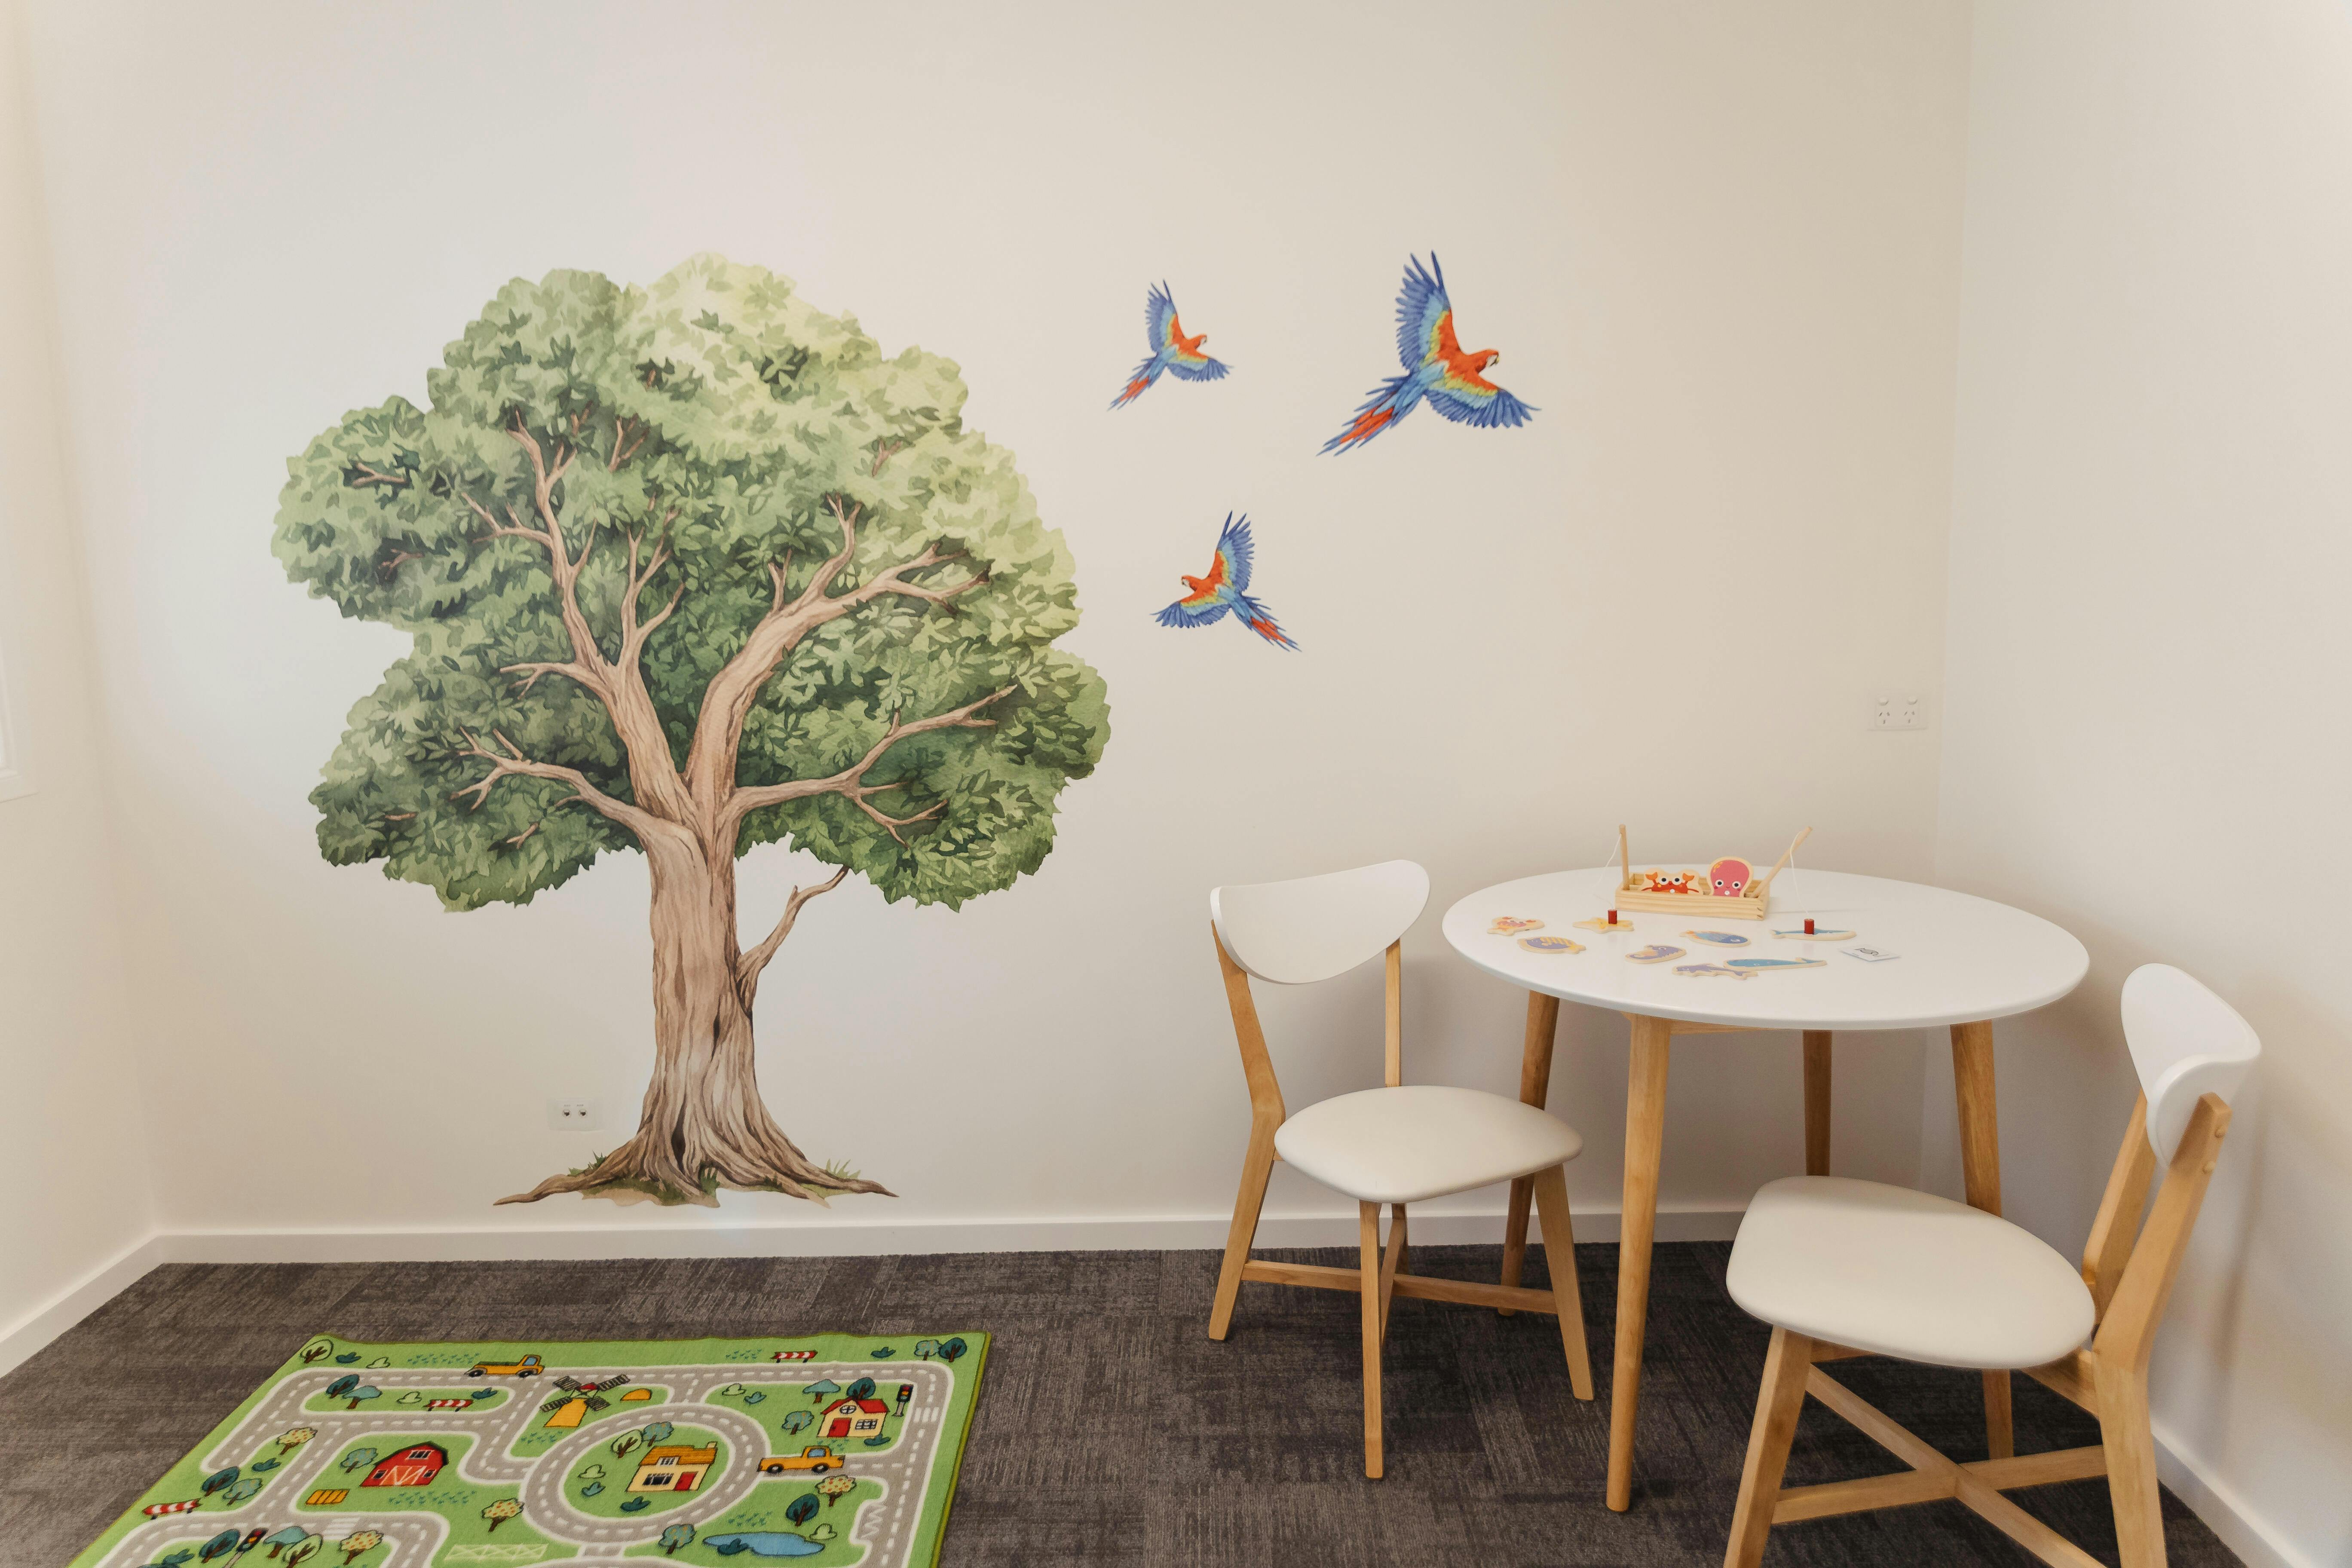
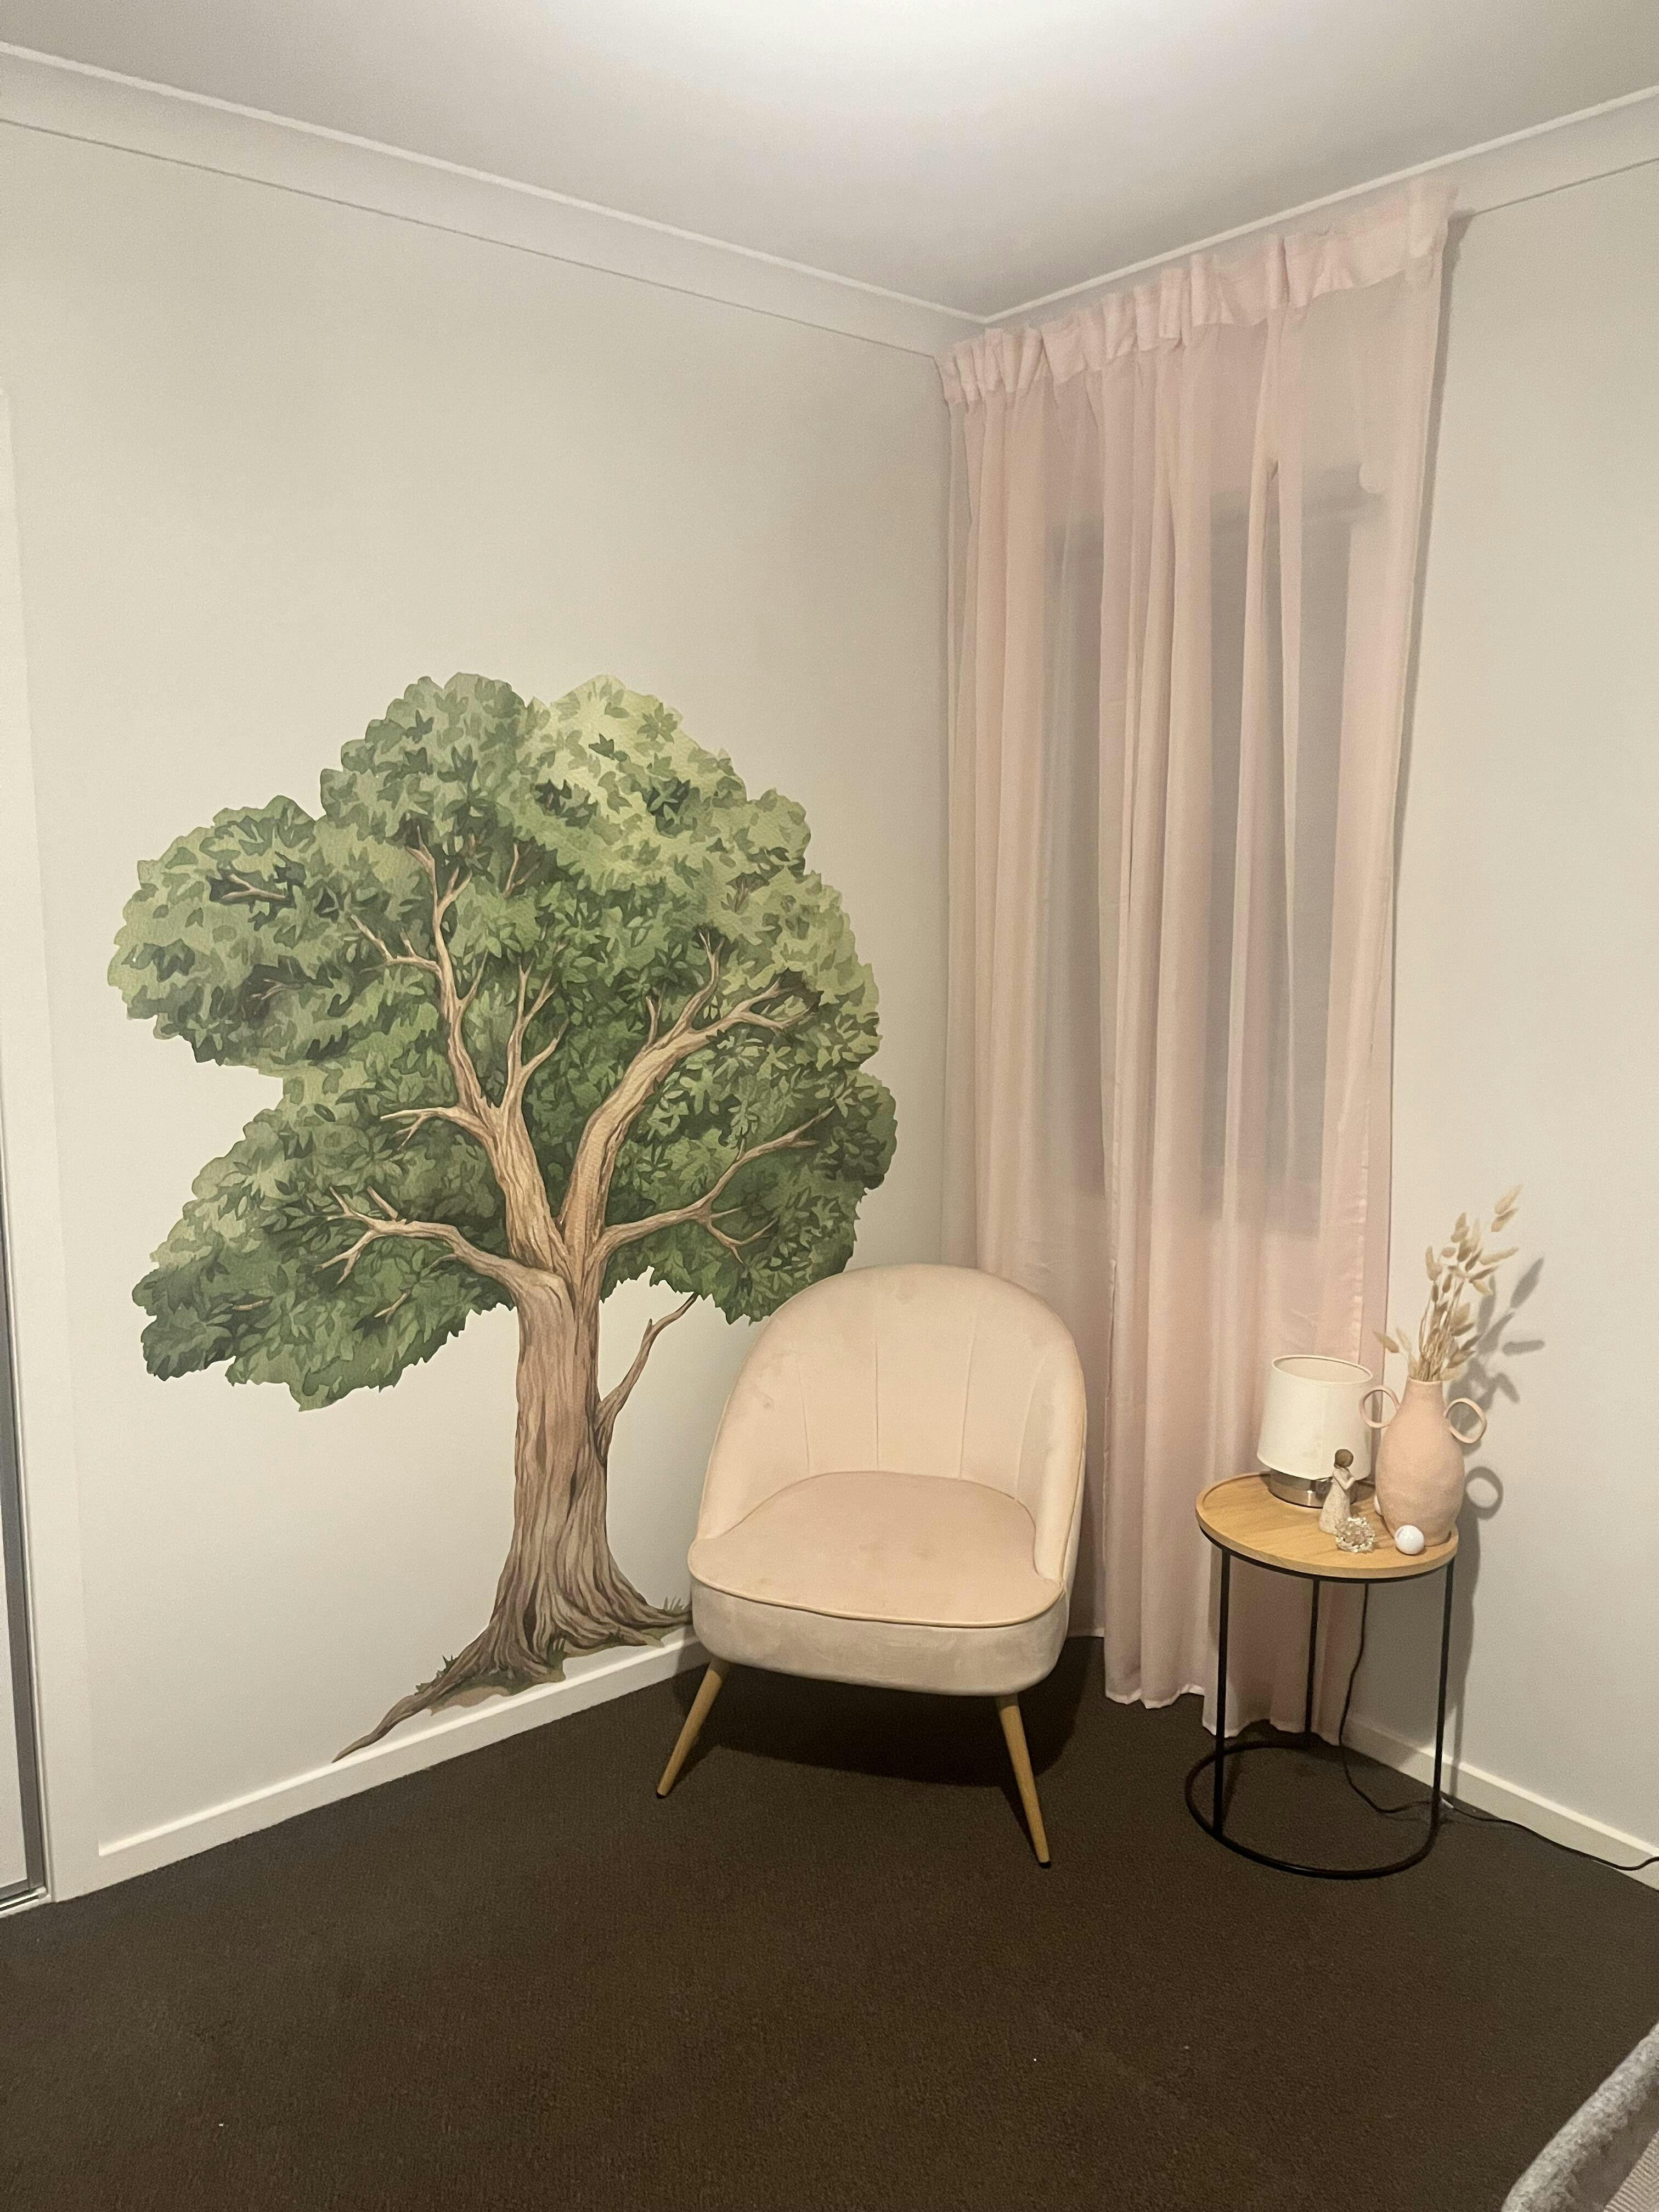
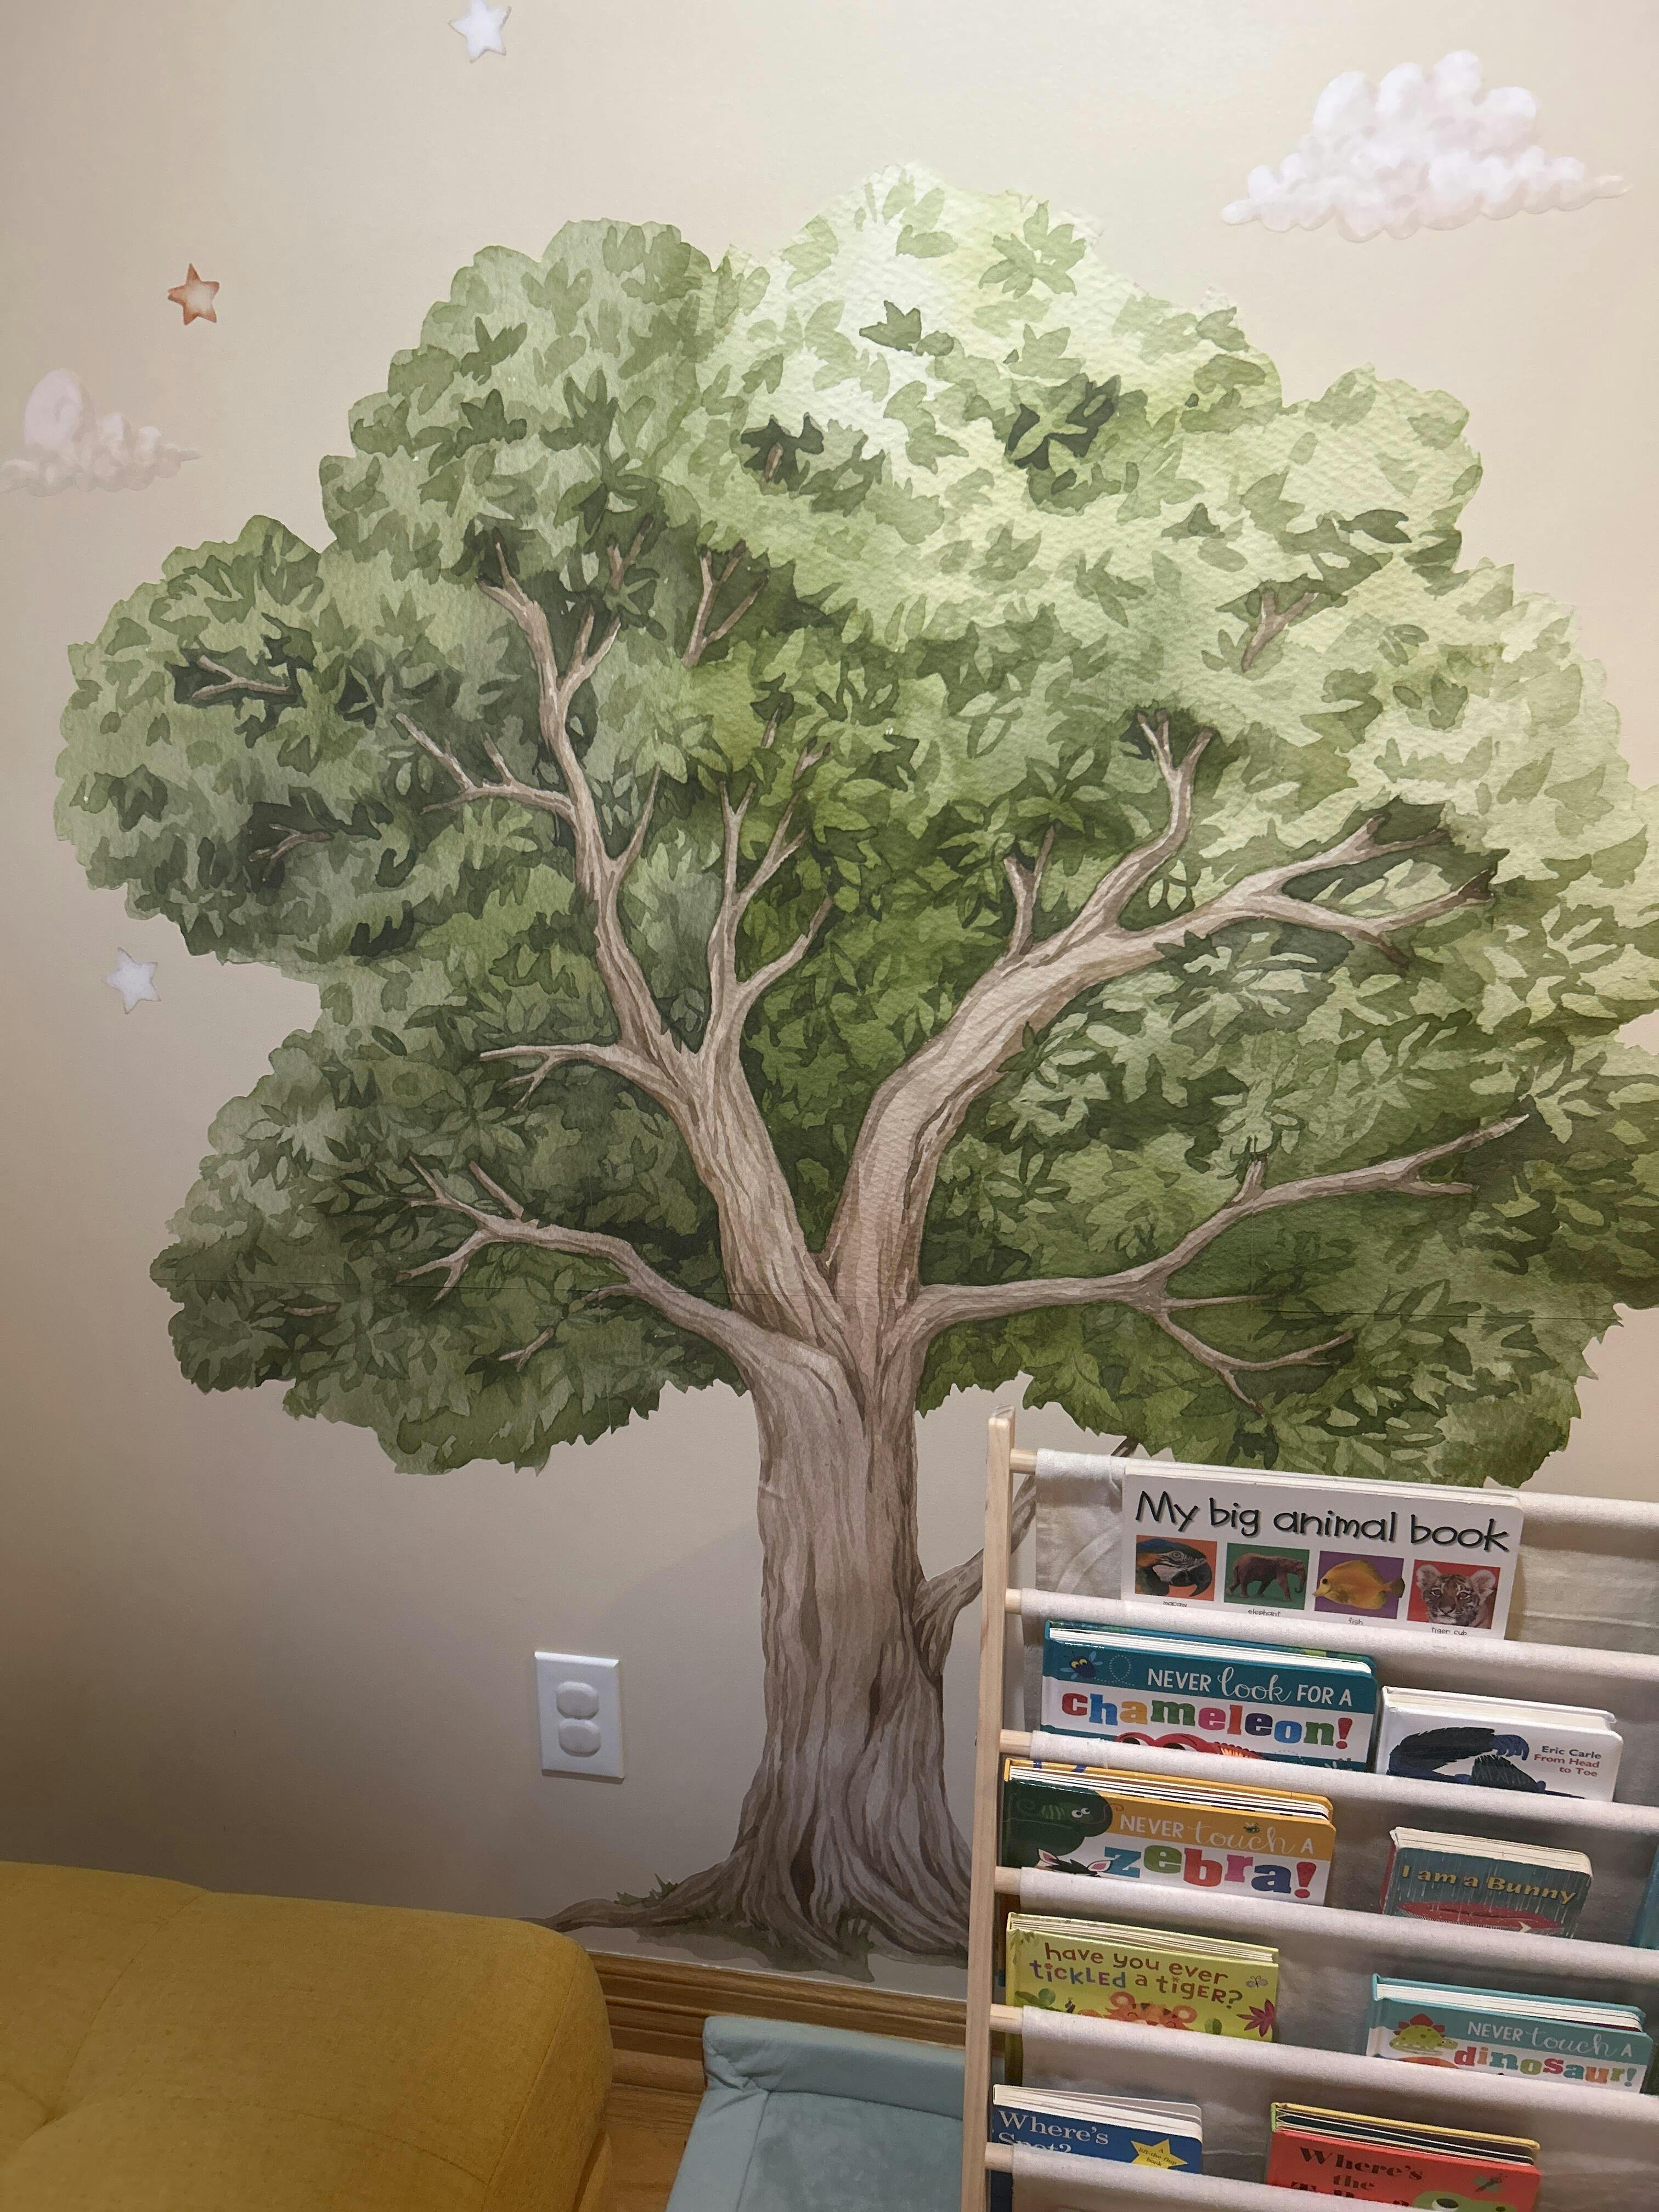
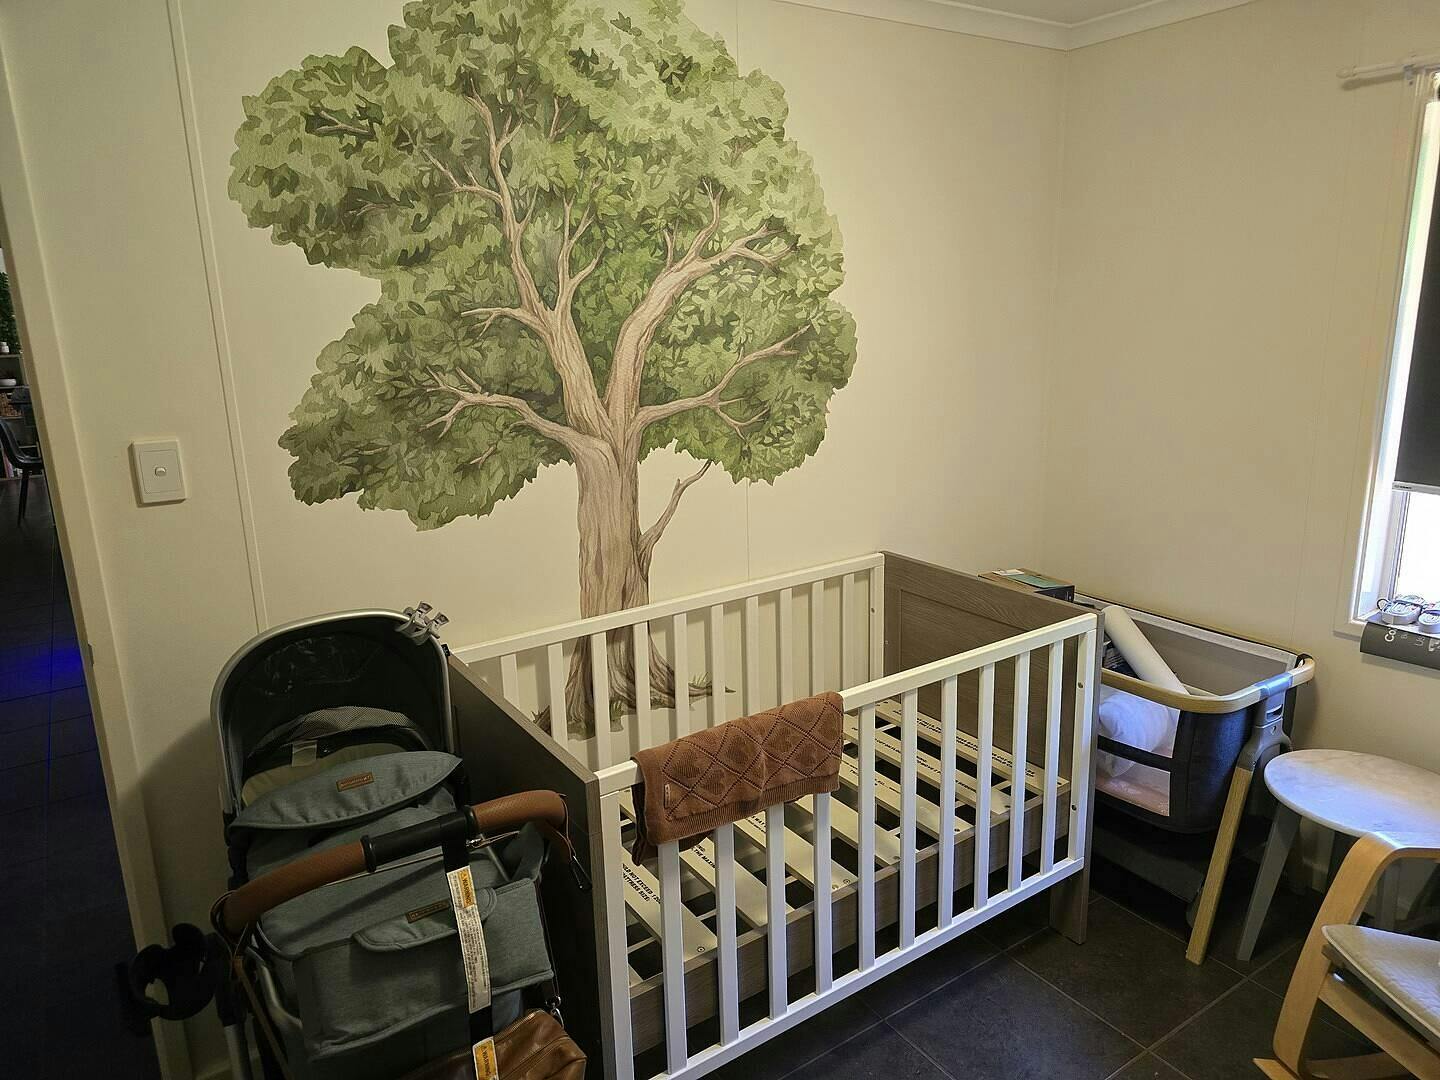
Bring the calming beauty of nature into your home with our Tranquil Oak Tree Wall Decal. This elegant design captures the strength and timelessness of the majestic oak, creating a peaceful, grounding atmosphere in any room.
Designed in multiple pieces for easy placement, you can arrange and adjust the tree to perfectly suit your space, creating a seamless, natural look that feels like a painted mural.
Whether it’s your living room, study, or bedroom, this decal transforms your walls into a serene woodland escape that invites relaxation and inspiration.
Installation is simple and fun — just peel, stick, and smooth. It’s a great way to refresh your space and create a calming environment your whole family will enjoy.
Size Information:
Medium Oak Tree: 1.5 m tall × 1.2 m wide canopy
Large Oak Tree: 1.8 m tall × 1.5 m wide canopy
How to Install
Test Sample (included free in every order)
- Choose a spot: Wipe clean with a damp microfiber cloth and let dry.
- Apply the sample: Peel, stick, and smooth down by hand.
- Wait 24–48 hrs: Check adhesion and paint hold.
- Remove with gentle heat: Warm with a hairdryer and peel slowly downwards, flat against the wall.
If the sample works, your decals will too. Fresh paint (30+ days), textured/porous walls, or poor prep may affect results.
Quick Install Guide
- Start with clean, dry, smooth walls and fully cured paint (30+ days after painting).
- Peel the decal from the backing.
- Position and smooth firmly with your hands or a soft squeegee.
- For larger pieces, cut and apply individually for easier alignment.
Most installs take just minutes.
Removal
- Warm with a hairdryer and peel slowly downwards, flat against the wall (not outwards).
Removal Guide
Warm a hairdryer on low heat over the decal for 30–60 seconds, then peel slowly from a corner in a downwards direction, keeping the decal as close to the wall as possible, Don't pull outwards from the wall. Heat again if needed.
Materials & Wall Types
Our decals are printed on premium, non-toxic polyester fabric with a soft matte finish — never vinyl. They use a removable, water-based adhesive so you can reposition during install and peel away when you’re ready for a change.
Best on: Smooth, fully cured painted walls finished with quality primer and acrylic paint.
Not suitable for: Textured walls, raw plaster, brick, bathrooms, or high-humidity areas.
Tip: For freshly painted walls, wait at least 30 days before applying. Avoid chalky, powdery, or flaking surfaces.
Shipping & Delivery
We ship quickly and carefully from our warehouse in Victoria, Australia.
Within Australia
• CURRENT DISPATCH TIMES Orders ship in 3 business days from our Melbourne Warehoues.
• Flat rate: $10 for orders under $149
• Free shipping on orders over $150
• Delivered straight to your door – no long waits
International Shipping
• Please contact us for a shipping quote
• All orders ship from Australia
Customs, Tariffs & Taxes
• Local duties, tariffs, or import taxes are determined by your country’s customs agency
• These charges are the responsibility of the recipient
We’re here to help you transform your space — and we’ll make sure your decals get to you, fast.
Hand-Painted Artwork, Only at Tiny Walls
Made & Dispatched Fast from Melbourne
Gentle on Walls, Parent-Approved
So Simple, Anyone Can Do It
Unpack
Peel & Place
Smooth & Adjust
Admire
Why Parents Choose Tiny Walls
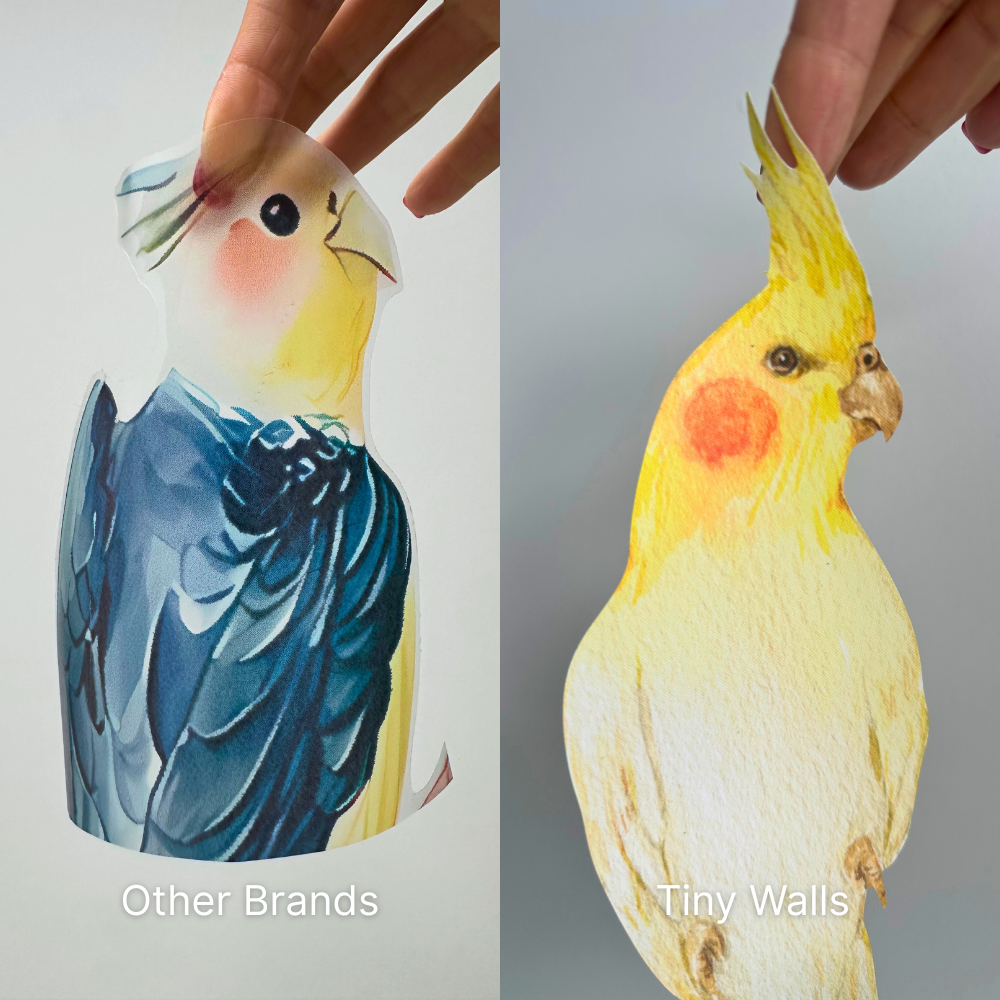
✖️ Vinyl = Shiny, plastic-looking.
✔️ Ours = Hand-painted matte fabric.
✖️ Vinyl = Bubbles & tears.
✔️ Ours = Smooth, repositionable.
✖️ Vinyl = Sticks permanently
✔️ Ours = Easy to remove, non-permanent adhesive
Create Their Dream Room, Without Picking Up a Paintbrush
This isn’t just decorating — it’s creating a space they’ll remember.
In under 10 minutes, you can turn a plain wall into something magical. Just peel, stick, and step back. No paint, no mess, and no stress.
Our premium fabric decals look hand-painted, but go on effortlessly — even if you’ve never done anything like this before.
As they grow and change, so can their room. It’s the easiest way to give them a space that feels like theirs — warm, fun, and full of personality.
Customer Reviews
We purchased both the Oak Tree and Parrot Wall Decals for our speech therapy clinic and absolutely love them—so do the kids! They create such a calming, beautiful space, and the customer service team were also very helpful!
Starting my lil girls nursery, this tree is perfect and so magical! Easy to install.
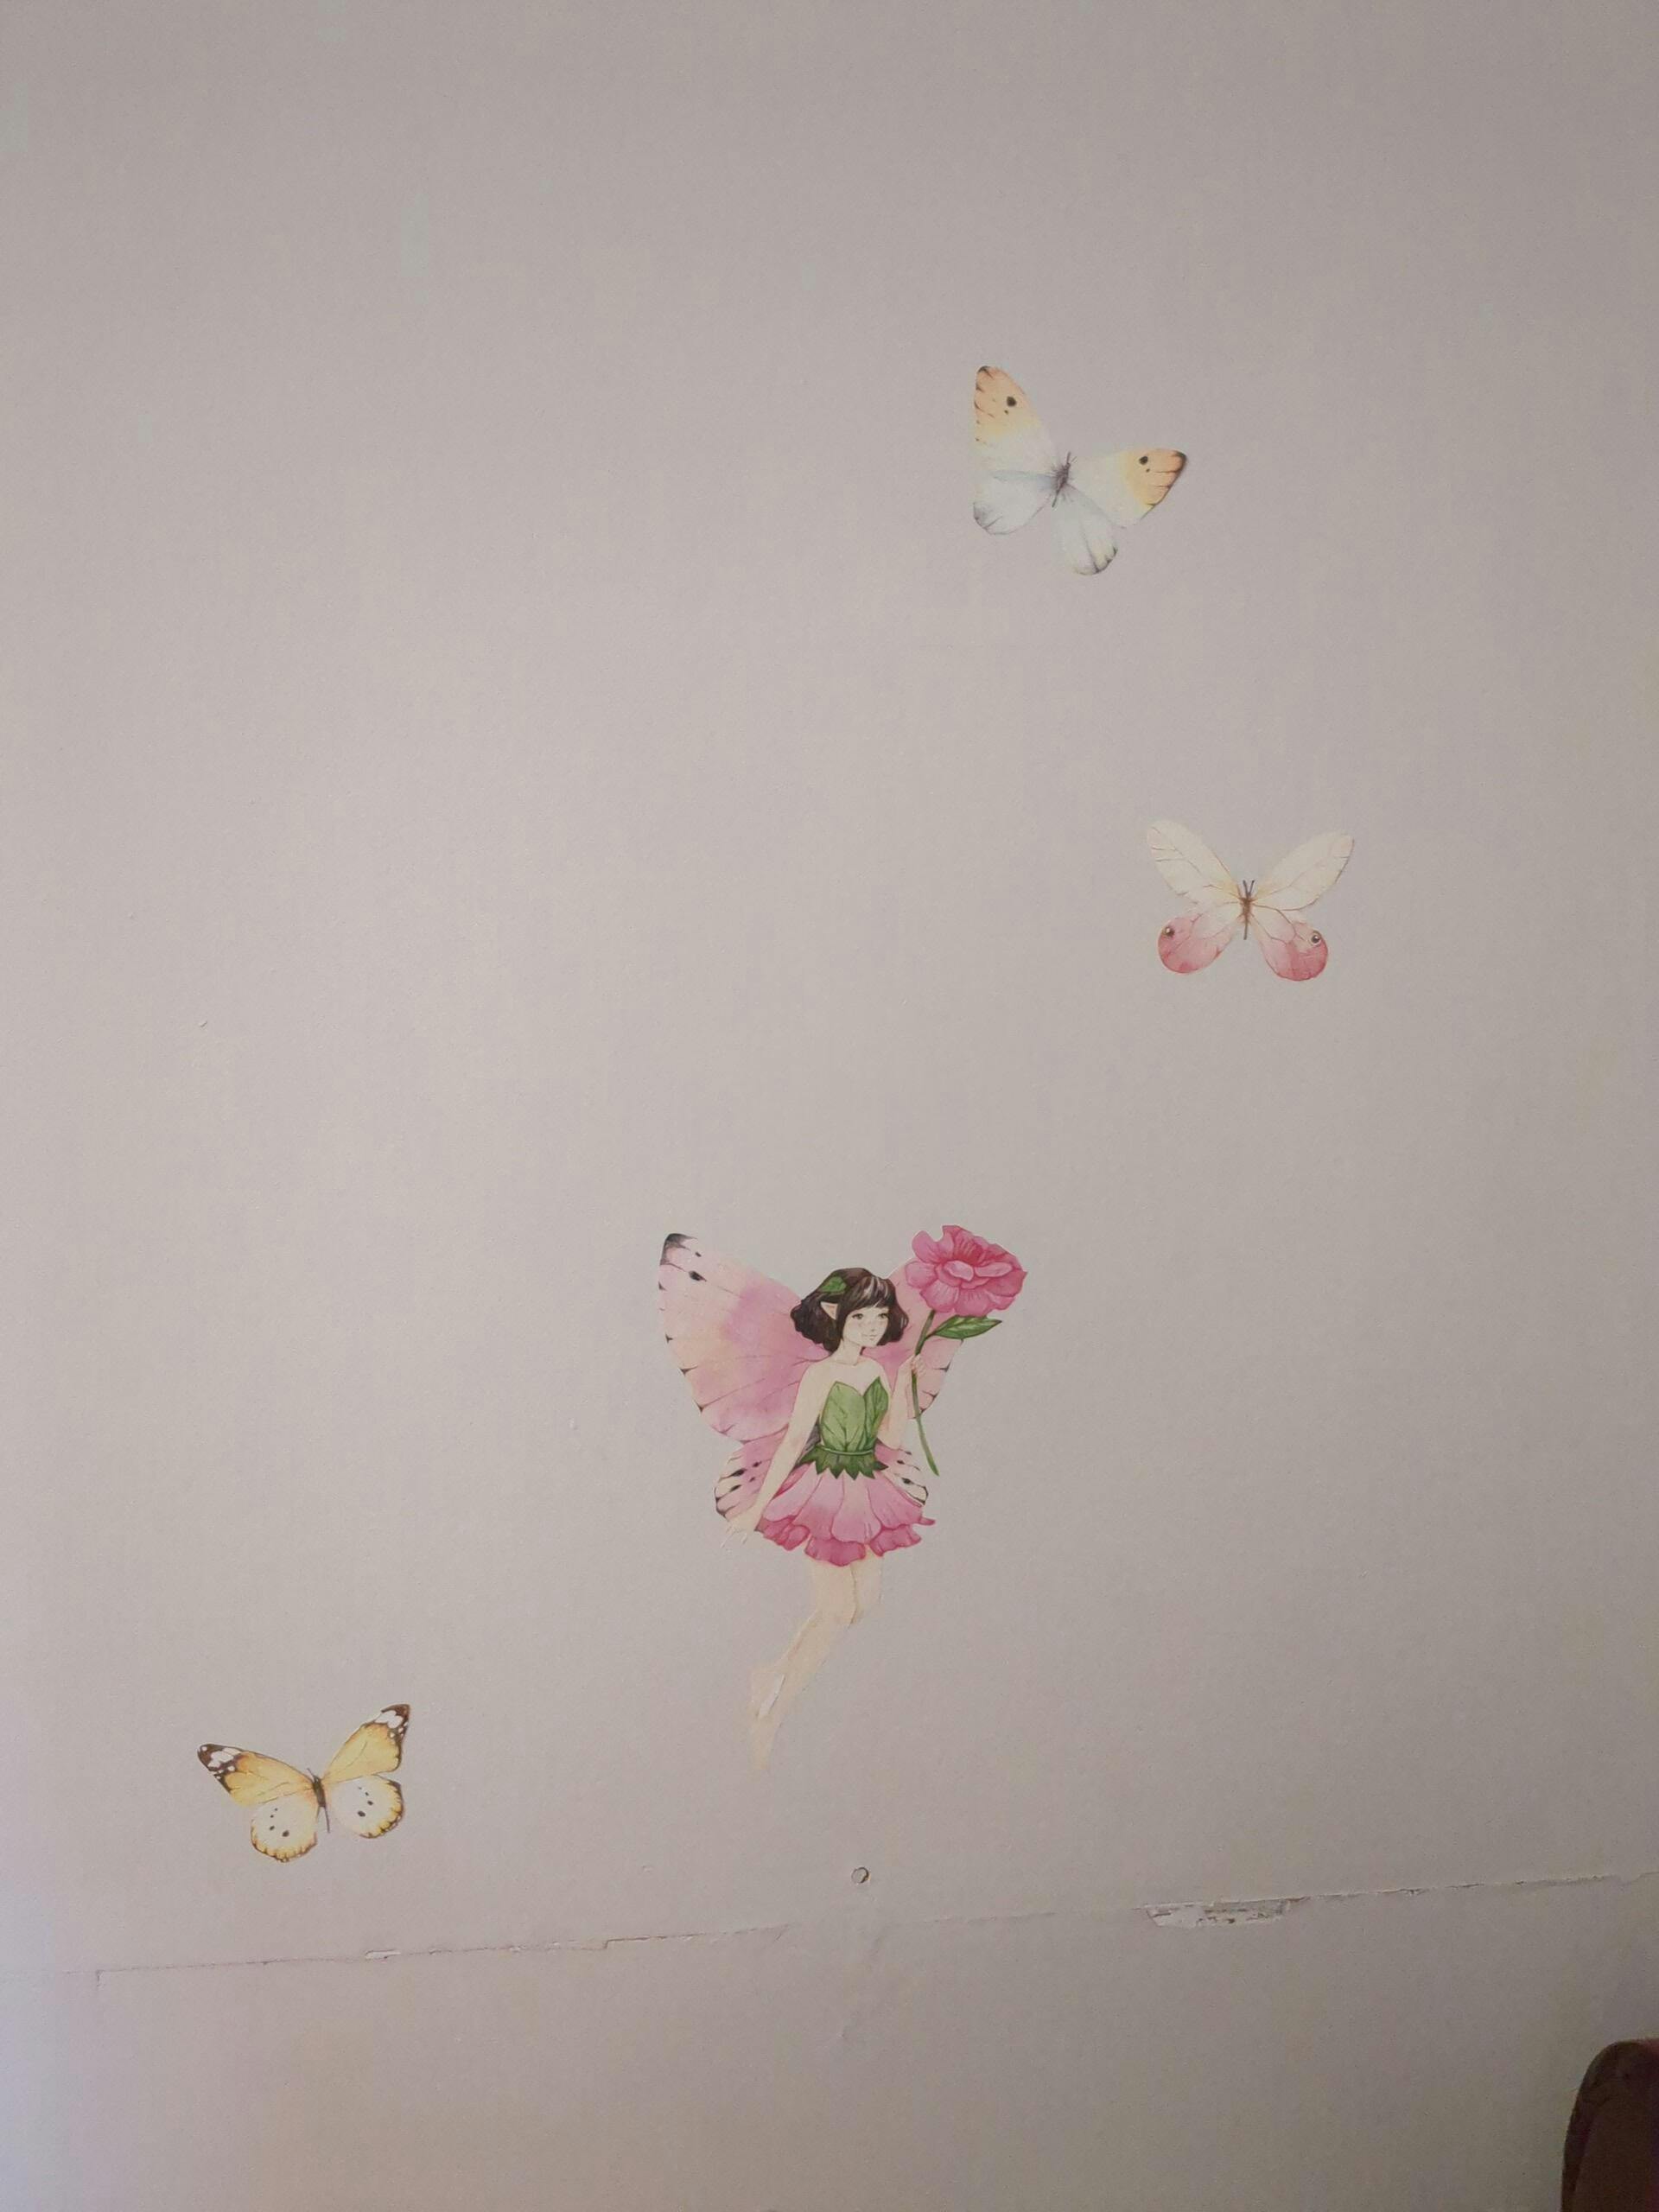
I purchased both the Oak tree and Small Fairy set and they look so good together! Super easy to install, beautiful colours, such an easy way to add colour to a boring wall. Daughter loves having fairies, fairy houses and doors around her room now. Husband was sceptical - now wants me to purchase more!


We put this in our son's playroom, in the book nook, and it's perfect! It was easy to apply and looks great
We absolutely love the beautiful big oak tree that just sets off our little man's nursery!
Your Questions, Answered
Will it damage my walls?
Will it damage my walls?
Our decals use a premium water-based adhesive designed to be gentle on walls. On properly painted and fully cured walls, they remove cleanly without residue. We always include a free test swatch so you can check your wall first.
How long does installation take?
How long does installation take?
Most parents install a full feature wall in under 20 minutes. Just peel, stick, smooth, and you’re done.
Do I need tools or glue?
Do I need tools or glue?
No tools, paste, or mess. You simply peel and stick. For large decals, painter’s tape can help with layout, but it’s optional.
Do they stick to textured walls?
Do they stick to textured walls?
Our decals are best on smooth, clean, fully cured walls. They may not adhere well to rough or highly textured surfaces, or to paints with Teflon/stain-resistant coatings. If unsure, test your free sample first.
Can I reuse them if I move?
Can I reuse them if I move?
Yes. Because they’re fabric, not vinyl, you can peel them off, store them on the original backing sheet (or corflute), and reuse them later. Keep adhesive clean and dust-free for best results.
What if I make a mistake during installation?
What if I make a mistake during installation?
No stress — just peel back and reposition. The fabric adhesive is forgiving, so you can adjust until it’s perfect.
Do the decals look painted on?
Do the decals look painted on?
Yes. Every Tiny Walls design is hand-painted by our artist and printed on premium matte fabric. They blend seamlessly, with no shiny plastic look.
Can I order samples first?
Can I order samples first?
Absolutely. Every order comes with a free wall test swatch. You can also order sample packs to check colours and scale before committing.
How long will they last?
How long will they last?
When installed on properly prepared walls, they’ll stay up for years without peeling, bubbling, or fading — even in busy kids’ rooms.
What makes Tiny Walls different from cheaper vinyl decals?
What makes Tiny Walls different from cheaper vinyl decals?
Vinyl decals are shiny, thin,, see through, and prone to tearing, bubbling, or damaging paint. Ours are premium fabric decals: matte, lifelike, reusable, and safe for renters when you follow our removal guides. It’s the difference between “stickers” and true wall art.