


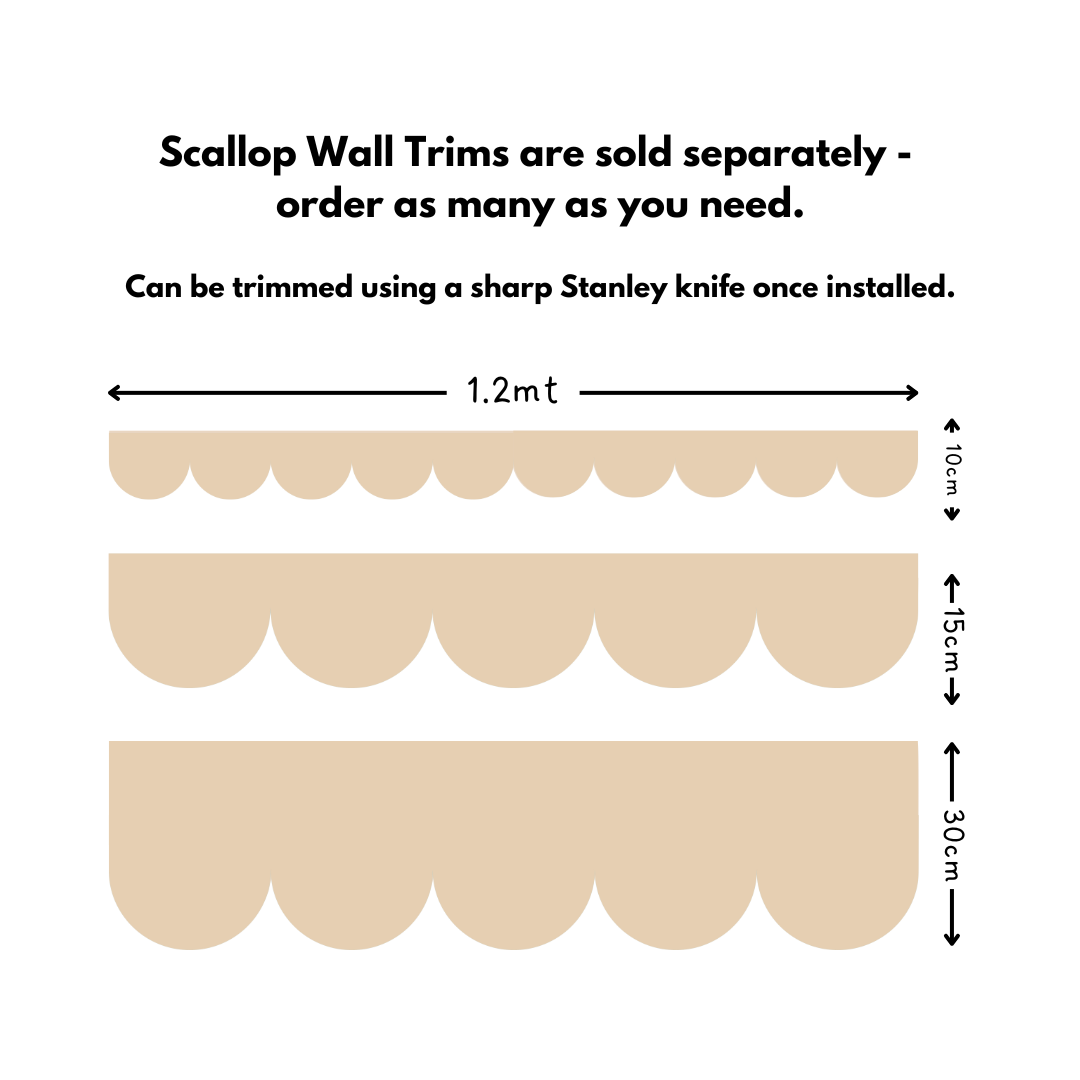


Scalloped Wall Trims (10cm/15cm/30cm High) - All Colours
Product Description + Sizing Info
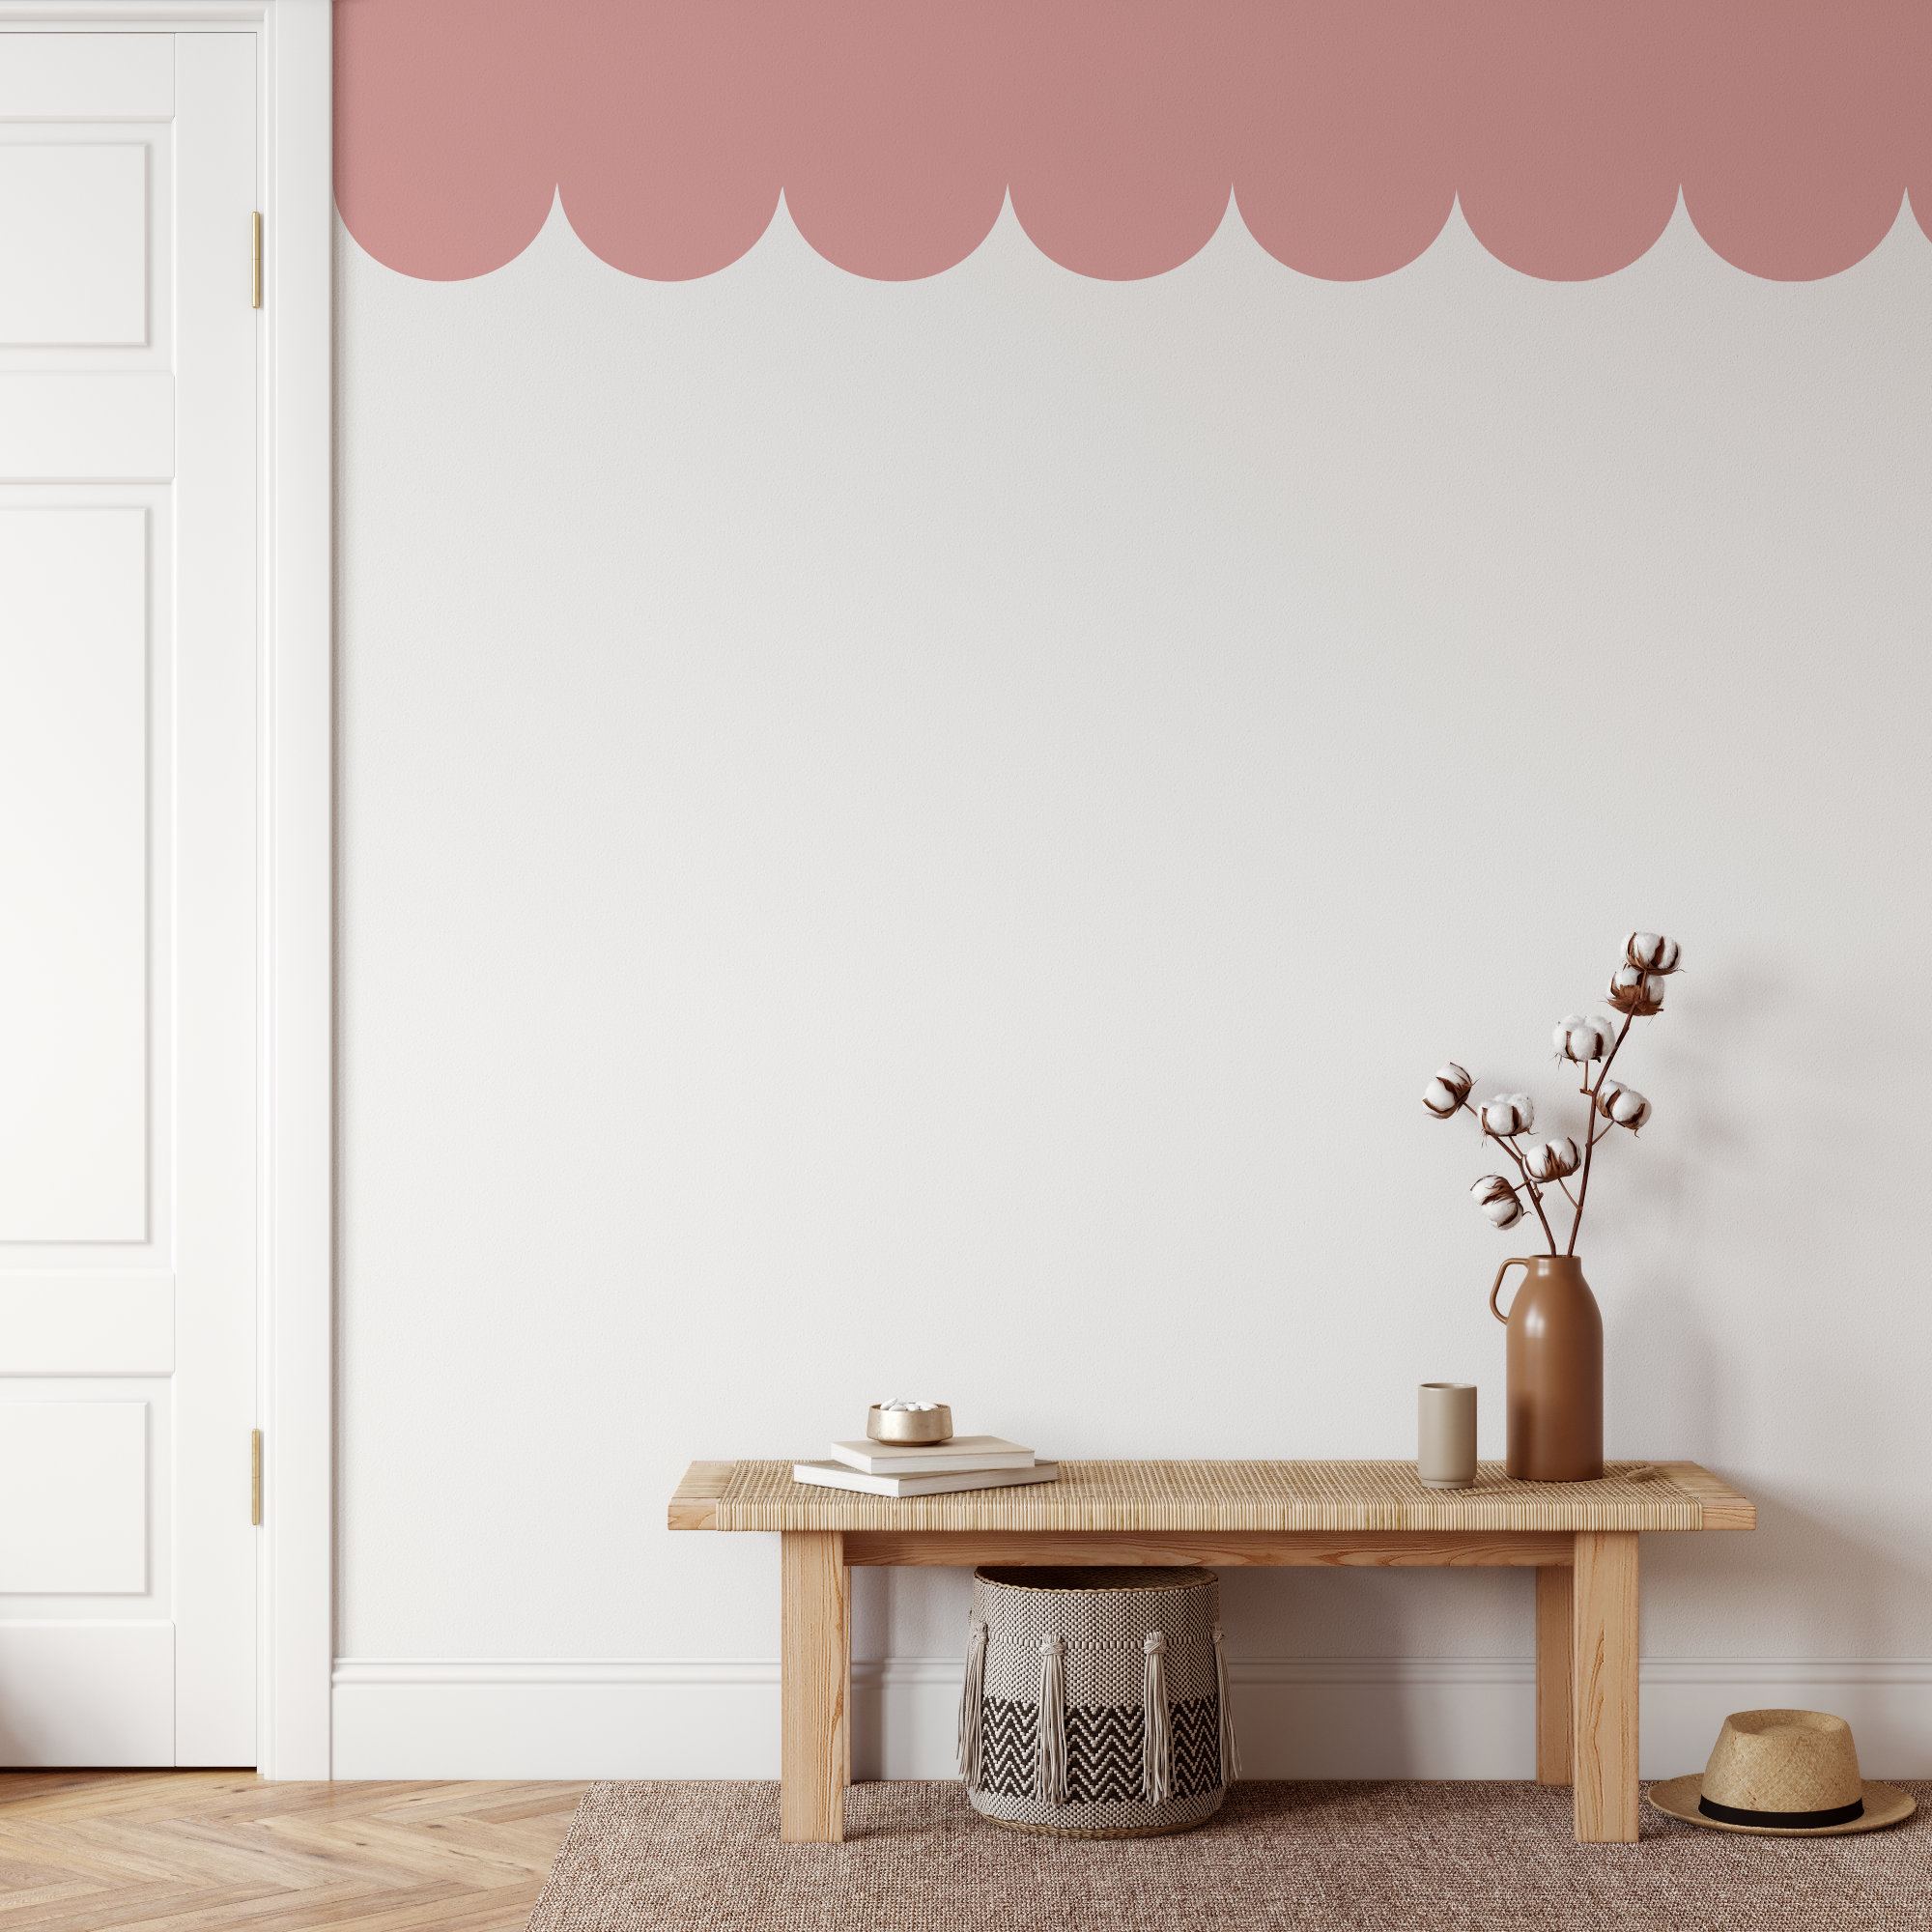
The quickest way to refresh and personalise any space, is by using our Scalloped Wall Trims. Perfect for nurseries, bedrooms, or feature walls, these trims create a whimsical finish that instantly transforms plain walls into something special.
Each trim measures 1.2m long and comes in your choice of height — 10cm, 15cm, or 30cm — so you can customise the look to suit your space. Designed to sit side by side for a seamless effect, they’re easy to install and can be trimmed to size with a sharp knife.
Ways to Use:
- Along the top or bottom of walls for a playful border
- Across the centre of walls for a bold feature line
- Framing doors, wardrobes, or windows
- Mix and match colours for a personalised look
Important Colour Info:
To ensure colour consistency, we recommend ordering enough trims in one purchase to complete your project. As with all block-colour decals, slight variations can occur between print batches due to ink and environmental changes.
Tip:
Order a sample first to test the colour in your space and lighting before committing to a full wall.
How to Install
Test Sample (included free in every order)
- Choose a spot: Wipe clean with a damp microfiber cloth and let dry.
- Apply the sample: Peel, stick, and smooth down by hand.
- Wait 24–48 hrs: Check adhesion and paint hold.
- Remove with gentle heat: Warm with a hairdryer and peel slowly downwards, flat against the wall.
If the sample works, your decals will too. Fresh paint (30+ days), textured/porous walls, or poor prep may affect results.
Quick Install Guide
- Start with clean, dry, smooth walls and fully cured paint (30+ days after painting).
- Peel the decal from the backing.
- Position and smooth firmly with your hands or a soft squeegee.
- For larger pieces, cut and apply individually for easier alignment.
Most installs take just minutes.
Removal
- Warm with a hairdryer and peel slowly downwards, flat against the wall (not outwards).
Removal Guide
Warm a hairdryer on low heat over the decal for 30–60 seconds, then peel slowly from a corner in a downwards direction, keeping the decal as close to the wall as possible, Don't pull outwards from the wall. Heat again if needed.
Materials & Wall Types
Our decals are printed on premium, non-toxic polyester fabric with a soft matte finish — never vinyl. They use a removable, water-based adhesive so you can reposition during install and peel away when you’re ready for a change.
Best on: Smooth, fully cured painted walls finished with quality primer and acrylic paint.
Not suitable for: Textured walls, raw plaster, brick, bathrooms, or high-humidity areas.
Tip: For freshly painted walls, wait at least 30 days before applying. Avoid chalky, powdery, or flaking surfaces.

Aussie made since 2019
Renter Approved
14 day Happiness guarantee
Non-toxic, premium fabric
Premium Fabric, never vinyl
Aussie made since 2019
Renter Approved
14 day Happiness guarantee
Non-toxic, premium fabric
Premium Fabric, never vinyl
Real customers. Real reviews.
Real customers.
Real reviews.
Install in under 10 minutes
PEEL
Lift from the sheet and stick to
a clean, dry wall.
STICK
Reposition as needed, the fabric and adhesive is forgiving.

SMILE
Step back and watch your child’s face light up.
Install in under 10 minutes
PEEL
Lift from the sheet and stick to
a clean, dry wall.
STICK
Reposition as needed, the fabric and adhesive is forgiving.
SMILE
Step back and watch your child’s face light up.
Loved by over 25,000 Aussie families
Premium Quality. Easy On Your Walls.
Premium fabric decals
Looks Hand painted
Non-permanent
Non-toxic
Easy to remove adhesive
Renter friendly
Printed in Melbourne
Tiny Walls
Cheap Stickers
Premium Quality. Easy On Your Walls.
Premium fabric decals
Looks Hand painted
Non-permanent
Non-toxic
Easy to remove adhesive
Renter friendly
Printed in Melbourne
Tiny Walls
Cheap Stickers
Frequently Asked Questions
You have questions, we have answers
Will it damage my walls?
Our decals use a water-based adhesive that’s designed to be gentle on walls. On properly painted, fully cured surfaces, they’ll peel off cleanly without leaving residue. Every order comes with a free test sample, so you can try it before you commit.
Do they stick to textured walls?
They’ll love smooth, clean walls best! If your walls are bumpy or have a heavy texture (like orange peel or render), the decals might not grip properly. Same goes for Teflon or stain-resistant paints. If you’re unsure, just test the sample we send it’ll tell you everything you need to know.
Can I reuse them if I move?
You can absolutely reposition them while installing, that’s part of the magic of our fabric material. Some customers have reused them successfully when moving, but it depends on how long they’ve been up and how carefully they’re stored. Think of them as repositionable, not forever reusable.
How long does installation take?
Most parents finish a full feature wall in under 20 minutes. There’s no paste, no glue, and no stress. Just peel, stick, and smooth. It’s seriously satisfying!
What if I make a mistake during installation?
No panic needed, just peel back and move it. Our decals are made from premium fabric, not vinyl, so they won’t stretch or tear. You can take your time until it looks perfect.
Do the decals look painted on?
Yes - that’s the whole idea! Every design is hand-painted by our artist, then printed on a matte fabric that blends beautifully with your wall. You won’t see any shine or plastic look, just soft, natural artwork that feels like it was painted directly on.
